The deadlift is one of the most powerful exercises you can do—but it’s also one of the most misunderstood.
Walk into any gym and you’ll see two types of lifters: those who approach the barbell with confidence, creating tension and pulling smoothly off the floor—and those who round their backs like a scared cat, grinding through reps that make you wince.
The difference? One learned the pattern before loading it.
Deadlifts don’t break backs—they build them. But only if you know how to hinge properly first.
In this comprehensive guide, you’ll learn the exact 3-stage progression system we use with our clients to build strong, pain-free deadlifts that last. Whether you’re a complete beginner or an experienced lifter looking to refine your technique, this guide will meet you where you are and show you exactly how to progress.
What you’ll learn:
- How to assess your current movement quality
- The breathing and bracing mechanics that protect your spine
- A 3-stage progression from bodyweight to barbell
- How to choose the right deadlift variation for YOUR body
- How to program the hinge throughout your training week
- Solutions to every common problem and question
- Let’s build your deadlift from the ground up.
Estimated reading time: 22 minutes
Use this guide as a reference—click any section to jump directly to it:
Table of Contents
ToggleThe Learn-Load-Lift Deadlift System
Now that you’ve identified your starting point, let’s dive into the complete progression system. The following three stages will take you from learning the basic movement pattern to confidently handling heavy loads.
Picture this: You’re at the gym watching someone load up a barbell for deadlifts. They approach the bar, grab it, and immediately their back rounds like a scared cat. They grunt, they strain, they somehow get the weight up — and you wince knowing that’s not going to end well.
Now picture the lifter next to them: They set up with intention, create tension throughout their body, and pull the weight smoothly off the floor like it’s choreographed. Same exercise. Completely different execution.
What’s the difference? One learned the pattern before loading it.
Deadlifts don’t break backs — they build them. But here’s the truth most people skip: You can’t load what you haven’t learned.
The hip hinge is the foundation of every strong, pain-free deadlift. It’s the skill that protects your spine, powers your posterior chain, and transfers to everything from picking up groceries to pulling heavy weight.
Most people rush to the barbell. Smart lifters build the pattern first — then load it.
This article walks you through the exact progression we use with clients to build a bulletproof hinge — from Day 1 to PRs. No skipping steps. No winging it. Just a clear path from learning the movement to owning it under load.
Key Takeaways
If you only remember 5 things from this guide, make it these:
- Assess before you progress – Use the lightly loaded RDL screen to find your starting point
- Master breathing and bracing – This protects your spine under every load
- Earn each stage – Don’t rush to the barbell if the pattern isn’t solid
- Choose the right variation – Conventional isn’t the gold standard; the right variation for YOUR body is
- Train the hinge 2-3x per week – Vary the stress, keep the pattern sharp
Why the Hip Hinge Comes First
Before you deadlift, you hinge. Before you hinge with weight, you hinge with intention.
The hip hinge teaches your body:
✅ How to move from the hips — not the lower back
✅ How to maintain a neutral spine under tension
✅ How to activate glutes and hamstrings as the primary movers
✅ How to create full-body tension before pulling
When you own the hinge pattern, deadlifting becomes instinctive. When you skip it, every rep is a gamble.
Breathing & Bracing: The Foundation of Safe Loading
Before you can load the hinge properly, you need to understand how to create spinal stability through breathing and bracing. This isn’t just “take a deep breath” — it’s a coordinated system that protects your spine under load.
Understanding 360° Breathing
Most people breathe into their chest and shoulders, creating tension in the neck and failing to stabilize the spine. Proper bracing starts with 360° breathing — expanding your ribcage and abdomen in all directions, not just forward.
How to practice 360° breathing:
- Place each hand on your lower ribs (sides)
- Inhale through your nose, directing air into your belly AND sides
- You should feel expansion front, back, and both sides — like inflating a balloon in your torso
- Your shoulders shouldn’t rise significantly
- Exhale slowly and feel everything deflate
Why this matters: This creates intra-abdominal pressure (IAP) that stabilizes your spine like a pressurized cylinder. The more evenly you distribute this pressure, the more stable your spine becomes.
The Bracing Sequence
Bracing isn’t just breathing — it’s breathing + tension. Here’s the sequence:
1. Set your position
Get into your starting hinge position with neutral spine, good hip hinge, and proper setup.
2. Breathe INTO the brace
Take a 360° breath into your belly and ribs. Think “fill the tank.”
3. Lock it down
Before pulling, bear down like you’re bracing for a punch to the gut. This locks the air in place and creates rigidity through your trunk. Some people cue “pull your ribs down” or “tighten your belt” to engage the anterior core.
4. Maintain tension through the lift
Hold this braced position through the entire rep — from floor to lockout. Don’t lose tension at the top.
5. Reset at the top
At full lockout, you can exhale and reset for the next rep. For heavy singles or low-rep work, many lifters re-brace at the top before lowering. For higher-rep sets, you might maintain the brace across multiple reps.
Common Bracing Mistakes
❌ Breathing into the chest/shoulders
✅ Fix: Practice 360° breathing lying on your back first, then transfer to standing
❌ Holding breath without creating tension
✅ Fix: Think “brace AND breathe,” not just “hold your breath”
❌ Losing the brace mid-rep
✅ Fix: Reduce the load and focus on maintaining tension through the entire range of motion
❌ Over-extending the lower back when bracing
✅ Fix: Cue “ribs down” or “exhale slightly to set ribs” before creating the brace
❌ Bracing too late (after already starting to pull)
✅ Fix: Practice the sequence: Position → Breathe → Brace → Pull
How Bracing Changes Across Stages
Stage 1 (Learning the Pattern):
Focus on breathing mechanics without load. Practice 360° breathing in the hinge position. You’re not bracing maximally here — you’re learning where to breathe and how to maintain a neutral spine with breath.
Stage 2 (Adding Load):
This is where you integrate true bracing. The load demands stability, so you’ll practice the full sequence: breathe, brace, lift. Start light and focus on maintaining the brace through each rep.
Stage 3 (Barbell Work):
Bracing becomes automatic and maximal. Heavy loads require maximal bracing before every rep. You’ll develop a consistent pre-lift routine that includes your bracing sequence.
Bracing Cues That Help
- “Big belly breath” — Encourages breathing into the abdomen
- “Fill the sides” — Promotes 360° expansion
- “Ribs down” — Prevents overextension of the lower back
- “Brace or bear down like someone’s about to punch you” — Creates appropriate tension
- “Lock it in” — Reminds you to create rigidity before pulling
Good bracing isn’t optional — it’s the difference between a safe lift and a risky one. Master it early, and every stage becomes safer and more effective.
Where to Start: Screen Before You Program
Here’s what most beginner coaches get wrong: they make assumptions instead of assessments.
Mistake #1: Forcing everyone to start at Stage 1
Wasting training time on rudimentary patterns that proficient movers don’t need.
Mistake #2: Jumping straight to Stage 3
Loading the barbell before the foundation is built, hoping technique will “figure itself out” under load.
Both extremes miss the point: meet people where they are, not where you think they should be.
Instead, start with a simple movement screen:
The Lightly Loaded RDL Screen
This isn’t a passive observation — it’s an active coaching opportunity.
Some schools of thought say screens should capture “natural” movement without any coaching. We disagree. We’re coaches by trade, and our expertise exists to help people move better from rep one. The screen isn’t about watching them fail — it’s about seeing how they respond to coaching and load.
Setup:
• Start with a light dumbbell or kettlebell (10–20 lbs for most people)
• Have them hold the weight in both hands at thigh level
• Feet hip-width apart, weight balanced mid-foot
The Screen: Ask them to perform a Romanian Deadlift (RDL) — hinge at the hips, lower the weight down the front of their legs, then return to standing.
What You’re Looking For:
✅ Vertical shins — The movement comes from the hips, not the knees. Shins stay relatively perpendicular to the floor throughout the movement.
✅ Posterior hip shift with slight knee bend — Hips push back (not down), knees soften but don’t dive forward. Think “reaching back” not “sitting down.”
✅ Neutral spine — No excessive rounding (flexion) or arching (extension) in the lower back. The spine maintains its natural curves. Movement is generated from the hips, not the spine.
✅ No unwanted rotation or lateral shifts — Knees track in line with toes (no collapse inward), feet stay rooted (no rolling to inside or outside edge), hips stay level (no hiking or shifting weight to one side).
✅ Vertical load path — The weight stays close to the body and travels straight up and down. It shouldn’t swing away from the body or loop outward.
✅ Body awareness and confidence — They can feel where they are in space, they move with control (not hesitation or fear), and they can repeat the movement consistently.
Coaching Cues to Use During the Screen:
These cues help you see how coachable the movement is and whether the person can integrate feedback in real-time:
- “Exhale and draw the ribs down” — Helps establish core position and prevents overextension of the lower back
- “Tickle defense” — Cue them to keep their lats engaged (imagine protecting their armpits from being tickled). This creates upper back tension and keeps the weight close to the body
- “Reach your hips back like you’re closing a car door with your hands full” — Promotes the posterior hip shift without overthinking the movement
- “Root your feet” — Encourages them to grip the floor with their feet, creating a stable base and preventing foot collapse
Interpreting the Results:
If the movement looks good and feels good:
→ They can bypass Stage 1 and start at Stage 2 or Stage 3 depending on proficiency
→ Increase load or progress to a more challenging variation
→ The pattern is there — now it’s time to build strength
If coaching cues improve the movement significantly:
→ They have the physical capacity but need motor control refinement
→ Consider starting at Stage 1 with light load to groove the pattern with feedback
→ Progress quickly once the pattern clicks
If the movement breaks down or causes discomfort:
→ Note where the breakdown occurs (spine position? knee collapse? weight path?)
→ Ask: Is there a coaching opportunity that can immediately improve this movement?
→ Try tactical coaching interventions before regressing:
Common Breakdowns & Coaching Fixes:
Weight shifts forward / struggles with posterior hip shift:
Add a front-loaded band (RNT – Reactive Neuromuscular Training) attached to the load or wrists. The band pulls them forward, forcing them to resist and push back. This creates the posterior shift reflexively.
Soft lockout or limited hip extension:
Add a band around the waist (anchored behind them) to promote full hip extension driven from the glutes. The band provides a slight assist pulling the hips into greater extension and teaches what a complete lockout should feel like.
Lats disengaged / weight drifts away from body:
Use the same front-loaded band setup as above. The forward pull forces them to engage their lats to keep the weight close, teaching them to actively “pull the weight into the body.” Pair with the “tickle defense” cue.
Chest drops / loses neutral spine:
Cue the sternum: “Keep your chest proud” or “sternum up and forward.” Sometimes cueing the eyes helps: “Look at the horizon, not down at the floor.”
Head position issues (looking up or down excessively):
Cue the eyes to a neutral focal point about 6-10 feet in front of them. “Where your eyes go, your head follows.”
If these interventions clean up the movement, they may be able to start at Stage 2 with those coaching strategies in place. If the breakdown persists despite coaching:
→ They’re still training — just focusing on building the foundation first
→ Drop back to bodyweight variations at Stage 1 to teach the standing hinge pattern
→ Use the coaching cues and interventions above to help them feel the correct positions
→ Meanwhile, they can still train hip extension strength with exercises like glute bridges, hip thrusts, or kneeling banded hip thrusts
→ These exercises build the posterior chain musculature that supports the hinge pattern without requiring the same motor control demands
Everyone gets to train. What that training looks like depends on their current movement ability.
Smart coaches meet clients where they are — not where the template says they should be. The screen tells you the starting point. The coaching tells you the path forward.
Now that you understand how to assess movement quality and identify starting points, let’s translate that assessment into action. The following decision tree will help you choose your entry point and begin building your deadlift foundation immediately.
Quick Start Guide
Not sure where to begin? Use this decision tree:
✅ You passed the lightly loaded RDL screen with good form:
→ Start at Stage 2 (loaded hinges) or Stage 3 (barbell work) depending on your training experience
→ Focus on building strength and refining technique under load
✅ You passed the screen but needed coaching cues to clean up the movement:
→ Start at Stage 1 with light load
→ Spend 2-4 weeks grooving the pattern with feedback
→ Progress to Stage 2 once the movement becomes automatic
✅ The movement broke down despite coaching interventions:
→ Start at Stage 1 with bodyweight variations
→ Build the motor pattern before adding load
→ Supplement with hip extension exercises (glute bridges, hip thrusts) to build strength
✅ You’re already deadlifting but want to refine technique:
→ Use Stage 2 exercises as technique days in your program
→ Film your lifts to identify specific breakdowns
→ Address weak points with targeted variations from the appropriate stage
✅ You’re coming back from injury or a long break:
→ Start at Stage 1 regardless of previous ability
→ Rebuild the pattern with intention
→ Progress quickly if movement quality is there, but don’t skip steps
Remember: Stages aren’t linear. You might use Stage 1 exercises as warm-ups, Stage 2 as primary work, and Stage 3 for strength testing — all in the same program.
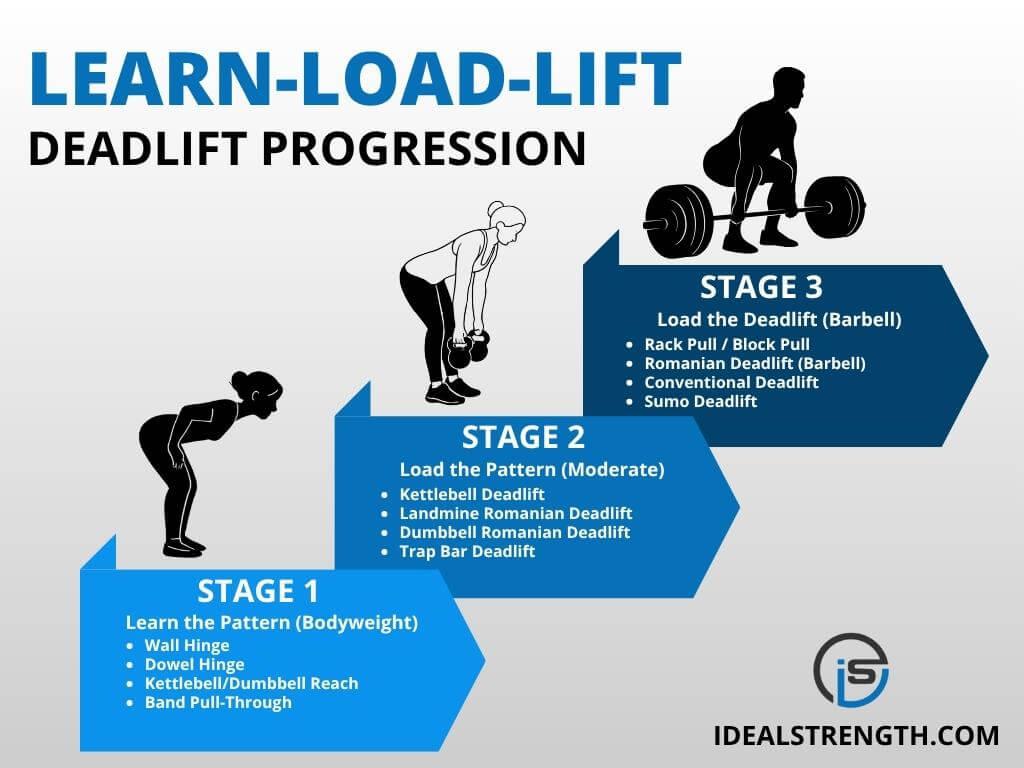
The Learn-Load-Lift Deadlift Progression System
The following three-stage system takes you from learning the basic movement pattern to confidently handling heavy loads. Each stage builds essential qualities that transfer to the next:
- Stage 1 develops motor control and body awareness
- Stage 2 adds external load while maintaining quality
- Stage 3 transfers the skill to barbell variations
This isn’t a rigid timeline — it’s a framework for intelligent progression based on your current abilities and how quickly you adapt.
This progression is a framework, not a prescription.
Some clients will start at Stage 1 and need weeks to own the pattern. Others will breeze through it in a single session and move straight to loaded work.
The stages exist to show logical progression — not to force everyone through the same sequence.
What matters is that each stage builds the foundation for the next:
- Stage 1 teaches the motor pattern
- Stage 2 adds load while maintaining quality
- Stage 3 transfers the skill to barbell work
Where you start depends on your movement screen. How fast you progress depends on how well you own each stage.
Use these stages as a diagnostic tool — not a checklist.
Typical Timeline Expectations:
- Stage 1: 1-4 weeks (depending on movement experience)
- Stage 2: 4-8 weeks (building load tolerance and strength)
- Stage 3: Ongoing (continuous refinement and strength building)
Stage 1: Learn the Pattern (Bodyweight)
Goal: Establish the hinge motor pattern with perfect form and zero load.
Wall Hinge: Learning Hip Movement with Instant Feedback
- Stand arm’s length from a wall, facing away
- Hinge back until glutes touch the wall
- Keep shins vertical, chest long
- Return to standing by driving hips forward
Why it works: The wall gives instant feedback — you can’t cheat the pattern.
Dowel Hinge: Building Neutral Spine Awareness
- Hold a dowel or PVC pipe along your spine (one hand on low back, one on upper back)
- Maintain three points of contact: head, upper back, tailbone
- Hinge back, keeping the dowel in place
- Focus on hip movement, not spine movement
Why it works: Teaches neutral spine awareness under movement.
Kettlebell/Dumbbell/Cable Reach and Counterbalance: Adding Light Load
- Hold a light weight in both hands or a cable with the pulley set down and in front of you
- Hinge back, letting the weight travel down your shins or slightly forward
- Keep the balance even through the feet, shins vertical
- Drive through heels to stand
Why it works: Adds light load while reinforcing the hinge pattern.
Band Pull Through
- Anchor a resistance band low behind you (between your legs)
- Face away from anchor, hold band between your legs
- Walk forward to create tension in the band
- Hinge back, letting the band pull you into deeper hip flexion
- Drive hips forward explosively to stand, squeezing glutes at the top
Why it works: The band pulls you into the hinge position, teaching you to resist and drive your hips forward powerfully. This creates a clear feedback loop — if you don’t drive your hips through, the band pulls you back. It’s excellent for learning the hip snap and glute engagement at lockout.
Mastery checkpoint:
✅ 3 sets of 10 reps with perfect form
✅ No lower back rounding or hyperextension
✅ Movement feels smooth and controlled
Stage 1 Mastery: Are You Ready to Progress to Stage 2?
Stage 1 built your movement foundation — now it’s time to challenge that pattern under load. But remember: adding weight amplifies everything. Good patterns get stronger; poor patterns get dangerous.
Before moving forward, ensure you’ve truly mastered the prerequisites below. If you have, Stage 2 will feel like a natural evolution. If you haven’t, a few more sessions at Stage 1 will save you months of fixing compensations later.
You should be able to:
- Perform wall hinges and dowel hinges with perfect form for 3×10
- Maintain neutral spine throughout the movement without external feedback (no dowel needed)
- Demonstrate the pattern consistently across multiple training sessions
- Explain and feel the difference between a hip hinge and a squat
- Complete a set of band pull throughs with explosive hip drive and clear glute engagement
If you can do all of the above, you’re ready to add load.
If you’re still working on any of these checkpoints, stay at Stage 1. There’s no rush — building a solid foundation now saves months (or years) of fixing compensations later.
Stage 2: Add Load & Tension (Loaded Hinge)
Goal: Introduce external resistance while maintaining pattern quality.
Kettlebell Deadlift: Your First Loaded Pull
- Feet hip-width, KB between feet
- Hinge to grab handle, tension before lifting
- Pull KB off ground by driving hips forward
- Lower with control
Coaching cue: “Wedge yourself into the weight before you lift it.”
Landmine Romanian Deadlift: Guided Hip Shift
- Stand facing the landmine, holding the end with both hands
- Hinge back, letting the bar arc naturally
- The pivot point guides your hip shift posteriorly
- Drive hips forward to return
Why landmine works: The fixed pivot and arc pattern teach the posterior hip shift without the instability of free weights. Great for grooving the hinge mechanics.
Dumbbell Romanian Deadlift (RDL): Building Eccentric Control
- Start standing with DBs at thighs
- Hinge back, letting DBs travel down front of legs
- Stop at mid-shin (or when you feel hamstring stretch)
- Drive hips forward to return
Why RDLs matter: They teach eccentric control and hamstring loading — the secret to a strong, safe pull.
Trap Bar Deadlift: User-Friendly Barbell Introduction
- Step inside trap bar, feet hip-width
- Hinge and grab high handles
- Brace, then push floor away
- Stand tall, then lower with control
Why trap bar: Neutral grip, more upright torso, easier to learn bracing mechanics.
Staggered Stance (1.5 Stance) Variations: Bridging to Single-Leg Work
Any of the above exercises can be performed in a staggered stance — one foot slightly behind the other with the back heel elevated. This stance bridges the gap between bilateral and single-leg work, providing just enough stability from the back leg while still challenging single-leg strength. It’s particularly useful for people who struggle with balance in true single-leg variations but are ready for more challenge than bilateral work. The back leg acts as a “kickstand,” helping you feel confident pushing your hips back.
Mastery checkpoint:
✅ 4 sets of 8 reps at moderate load
✅ Smooth tempo, no “searching” for position
✅ Glutes and hamstrings feel worked — not your lower back
Stage 2 Mastery: Are You Ready to Progress to Stage 3?
Stage 2 developed your ability to maintain the hinge pattern under load — now you’re ready to transfer this skill to barbell variations. Stage 3 isn’t just about lifting heavier; it’s about expressing the movement pattern you’ve mastered through the most challenging implements.
You should be able to:
- Perform loaded variations (KB, DB, trap bar) with 50+ lbs while maintaining form
- Maintain neutral spine and bracing under moderate fatigue (sets 3-4 still look like set 1)
- Feel confident in your ability to brace and create tension before pulling
- Complete 3-4 sets without significant form breakdown
- Recover well between sessions (no lingering pain or excessive soreness)
Red flags that you’re NOT ready:
- Form deteriorates significantly by the 3rd or 4th set
- You feel the work primarily in your lower back rather than glutes/hamstrings
- You’re still thinking through each rep (the pattern isn’t automatic yet)
- You need significant coaching cues to maintain position
- You experience pain during or after sessions
If you’re ready, Stage 3 awaits. If not, there’s no shame in building more capacity at Stage 2. Many lifters spend months here building strength and groove — and that’s exactly what should happen.
Stage 3: Barbell Progressions (Deadlift Variations)
Goal: Transfer the hinge to barbell variations with confidence and control.
Rack Pull / Block Pull: Building Confidence with Shorter Range
- Bar starts elevated (mid-shin to knee height)
- Shorter range = easier to maintain position
- Focus on bracing, tension, and strong lockout
Use case: Great for learning bar path and building confidence before full-range pulling.
Romanian Deadlift (Barbell): Eccentric Strength Under the Bar
- Start from the top (standing)
- Lower bar with control to mid-shin
- Hinge back, bar stays close
- Drive hips through to return
Use case: Builds eccentric strength and reinforces the hinge under barbell load.
Conventional Deadlift: The Classic Pull
- Bar over mid-foot
- Hinge down, grab bar just outside knees
- Brace, create tension, push floor away
- Stand tall, lockout hips and knees together
Use case: The classic pull — hip-dominant, full posterior chain.
Sumo Deadlift: Back-Friendly Alternative
- Wide stance, toes out 30–45°
- Hinge and grab bar between legs
- More upright torso, more quad involvement
- Great option if conventional bothers your back
Use case: Back-friendly alternative with more leg drive.
Mastery checkpoint:
✅ 3–5 sets of 5 reps with clean bar speed
✅ No pain, no position breakdown
✅ You can brace, pull, and reset with confidence
Quick Recap: The 3-Stage System
✅ Stage 1: Learn the hinge pattern with bodyweight movements (wall hinge, dowel hinge, band pull-throughs)
✅ Stage 2: Add external load while maintaining quality (KB deadlifts, DB RDLs, trap bar)
✅ Stage 3: Transfer to barbell variations with confidence (rack pulls, conventional, sumo)
Remember: Where you start depends on your movement screen. How fast you progress depends on how well you own each stage.
How to Choose Your Primary Deadlift Variation (Conventional vs. Sumo vs. Trap Bar)
Conventional Deadlift:
Best for: Those with longer arms relative to torso, good hip mobility, and a preference for hip-dominant pulling
Demands: Significant hamstring flexibility, strong posterior chain, good bracing
Common challenges: Can be hard on lower back if mobility is limited; requires precise setup
Who might avoid it: People with long femurs relative to torso, limited hip flexion mobility, or recurring lower back issues
Sumo Deadlift:
Best for: Those with shorter arms, limited hip flexion mobility, or those who prefer a more upright torso position
Demands: Good hip external rotation and adductor flexibility, strong quads and glutes
Common challenges: Requires more technical precision in setup; can be hard on hips/adductors initially
Who might avoid it: People with hip impingement issues or limited external rotation mobility
Trap Bar Deadlift:
Best for: Most people, honestly. It’s user-friendly, allows for heavy loading, and is easier on the back
Demands: Less mobility and technical demand than barbell variations
Common challenges: Fewer; this is the most forgiving variation
Who might avoid it: Powerlifters needing to compete with straight bar (otherwise, no reason to avoid)
Why staying with trap bar or RDLs long-term is perfectly valid: You don’t get extra points for doing the “hardest” variation. If trap bar or RDLs allow you to load heavy, train pain-free, and build strength — that’s the right choice for your body. Conventional deadlifts aren’t the gold standard; the right variation for YOUR anatomy is.
Programming Considerations for Stage 3
How often to pull from the floor:
Beginners: Once per week is sufficient once form is established
Intermediate: 1-2x per week with different variations or intensities
Advanced: Can handle 2-3x per week with intelligent variation and proper load/fatigue management
Block/Rack pulls vs. full ROM:
Use Block pulls as a progression tool (2-4 weeks) to build confidence with the bar path
Use Block pulls as an overload tool to train lockout strength
Don’t use partial ROM pulls as a permanent replacement for full ROM unless there’s a specific reason (injury, mobility limitation, etc.)
Rotating between conventional and sumo:
Some people do well rotating every 4-8 weeks
Others pick one as their primary and use the other as accessory work
There’s no rule — experiment and find what works for your body
Rep ranges for barbell work:
Strength focus: 3-5 reps (75-85% of max)
Hypertrophy focus: 6-10 reps (65-75% of max)
Technique refinement: 5-8 reps (60-70% of max)
Peaking/testing: 1-3 reps (85%+ of max)
How to structure a barbell hinge session:
- Warm-up with Stage 1 movement (wall hinge, band pull through)
- Build up with Stage 2 variation (KB or DB RDL, 2-3 warm-up sets)
- Primary barbell work (3-5 working sets)
- Optional accessory hinge work (Romanian deadlifts, single-leg work)
Progression Principles That Keep You Safe
1. Earn Each Stage — But Don’t Camp There
The biggest mistake beginner coaches make? Two extremes:
- Forcing everyone through Stage 1 when they don’t need it
- Jumping straight to Stage 3 without building the foundation first
If someone moves well at Stage 2, there’s no prize for making them “prove it” at Stage 1. But if someone struggles at Stage 3, backing up to Stage 2 isn’t a failure — it’s smart coaching.
Progress when the movement earns it. Regress when it needs support.
2. Systems Are Guidelines, Not Mandates
This progression exists to give you a map — not a rigid path.
Your anatomy, training history, and movement quality will dictate where you start and how fast you move. Some people will spend months mastering Stage 2 variations. Others will move through all three stages in a few weeks.
Context matters more than the system.
Use the framework to guide decisions, not replace them.
3. Use the Right Tool
Not every body is built for conventional deadlifts. Sumo, trap bar, or RDLs might be your best move — and that’s not a weakness, it’s smart training.
4. Volume Before Intensity
Build reps at moderate load before chasing heavy singles. Strength is built with a foundation of training most often in sets of 3–8 reps, not gunning for a weekly PR with sets of 1.
5. Listen to Feedback
Good fatigue = glutes, hamstrings, upper back.
Bad fatigue = sharp pain, lower back soreness that lingers.
Adjust the variation, not the effort.
6. Keep the Pattern Sharp
Your body doesn’t need to pull heavy every week — but it does need to hinge. Train the hip hinge 2–3 times per week with different variations and loading schemes to keep the pattern grooved and ready.
Some days are for strength (heavier RDLs, conventional pulls).
Some days are for stability and control (tempo work, single-leg variations).
Some days are for volume and hypertrophy (moderate load, higher reps).
The pattern stays consistent. The stress changes.
Common Hinge Mistakes (And How to Fix Them)
| Mistake | Fix |
| Squatting instead of hinging | Keep shins more vertical; push hips back first |
| Rounding the lower back | Use a lighter load; practice dowel hinge for awareness |
| Hyperextending at lockout | Finish tall, not leaned back; squeeze glutes, don’t thrust |
| Lifting with arms | Create tension before the pull; think “push the floor away” |
| Holding breath the whole rep | Brace at the bottom, breathe at the top |
How to Program the Hip Hinge: Weekly Training Examples
The hip hinge is a fundamental pattern that should be trained consistently, just like squatting, pushing, and pulling.
Train the hinge 2–3 times per week, but vary the stress.
This frequency keeps the motor pattern sharp while allowing adequate recovery between sessions. The key is undulating the stimulus — not every hinge session needs to be heavy, and not every session needs to look the same.
Think of it this way:
- Strength days prioritize load and lower reps (building max force production)
- Hypertrophy days use moderate loads with higher volume (building muscle and work capacity)
- Stability/control days challenge balance and positioning (refining motor control)
- Power days emphasize speed and explosiveness (training rate of force development)
- Conditioning days use lighter loads with higher reps or ballistic variations (building work capacity and cardiovascular fitness)
By rotating through these qualities, you build a well-rounded hinge that’s strong, resilient, and adaptable.
Example 1: Full-Body Split (3x/week)
Monday: KB RDL – 3×10 (moderate load, stability focus)
Wednesday: Trap Bar Deadlift – 4×5 (strength focus, primary lift)
Friday: Single-Leg RDL – 3×8/side (balance, unilateral control)
Why this works: You’re hitting the hinge three times but with different demands. Monday primes the pattern with moderate stress, Wednesday builds strength with a compound barbell movement, and Friday challenges stability without adding fatigue before the weekend.
Example 2: Upper/Lower Split (4x/week)
Lower A: Conventional Deadlift – 4×5 (strength, primary focus)
Lower B: 1.5 Stance DB RDL – 3×12/side (hypertrophy, tempo emphasis)
Why this works: Lower A is your heavy day where you chase progressive overload. Lower B uses a staggered stance variation with higher volume to build muscle, improve single-leg stability, and give your spine a break from bilateral loading.
The 1.5 stance (also called staggered stance) involves placing one foot slightly behind the other — typically with the back heel elevated and just the ball of the foot in contact with the ground. This creates a 70/30 or 80/20 weight distribution between the front and back leg.
Why the staggered stance is valuable: It bridges the gap between bilateral and true single-leg work. Many people struggle with single-leg RDLs because the balance demand is too high before they’ve mastered the hinge pattern under load. The staggered stance provides just enough support from the back leg to maintain stability while still challenging single-leg strength and control. This added stability often helps people feel the posterior hip shift more clearly — the back leg acts as a kickstand, giving them confidence to push their hips back without fear of falling backward. It’s an excellent teaching tool and progression step before moving to full single-leg variations.
Example 3: Push/Pull/Legs (3x/week)
Pull Day 1: Barbell RDL – 4×6 (strength, eccentric emphasis)
Leg Day: KB Swings – 4×15 (power endurance, explosive hips)
Pull Day 2: Single-Leg DB RDL – 3×10/side (stability, anti-rotation)
Why this works: You’re training three different expressions of the hinge. Pull Day 1 builds strength through the posterior chain with controlled eccentrics. Leg Day trains explosive hip extension and conditions the hinge under fatigue. Pull Day 2 challenges stability and prevents compensation patterns with unilateral work.
Example 4: Including Conditioning Work
Strength Day: Conventional Deadlift – 5×3 (heavy, primary lift)
Accessory Day: Landmine RDL – 3×10 (moderate, technique refinement)
Conditioning Day: KB Swings – 10 rounds of 15 seconds on/45 seconds off (metabolic conditioning)
Why this works: The conditioning day uses a ballistic hip hinge variation (KB swings) to build work capacity without the same mechanical stress as loaded deadlifts. This trains the hinge pattern under fatigue while improving cardiovascular fitness and posterior chain endurance. Swings are an excellent tool for maintaining the hip snap and power output while giving your spine a break from heavy axial loading.
Conditioning variations to consider:
- Kettlebell swings (American or Russian style)
- Dumbbell snatches
- Med ball slams (hip-driven)
- Sled drags or pushes (hip extension focus)
These movements keep the hinge pattern active while building different energy systems and movement qualities.
Key Principles for Programming the Hinge:
✅ Rotate variations based on training goal — Strength, hypertrophy, stability, power, and conditioning all have a place in your program. Don’t just do the same deadlift variation every week.
✅ Undulate volume and intensity across the week — Heavy one day, moderate the next, lighter/technical on the third. This prevents overtraining while maintaining frequency.
✅ Keep the pattern consistent — the tool changes, not the movement — Whether it’s a kettlebell, dumbbell, barbell, or trap bar, you’re still hinging. The neural pattern stays grooved even as the implements rotate.
✅ Match variation to training status — Beginners benefit from stable, predictable variations (trap bar, KB). Advanced lifters can handle more variability (conventional, sumo, single-leg).
✅ Don’t max out every session — Most hinge work should live in the 5-12 rep range. Heavy singles have their place, but they shouldn’t dominate your training.
✅ Use conditioning variations strategically — Ballistic hinge variations like KB swings are excellent for building work capacity and maintaining the pattern without the same mechanical stress as heavy deadlifts.
The hip hinge is a foundational movement pattern. It needs a permanent, intelligently varied spot in your training routine.
FAQ & Troubleshooting
Quick Navigation:
Jump to your question:
“How long should I stay at each stage?”
It depends entirely on your movement quality and training history.
- Complete beginners might spend 2-4 weeks at Stage 1 learning the pattern
- Athletic individuals with good body awareness might move through Stage 1 in a single session
- Experienced lifters refining technique might use Stage 2 as supplemental work while primarily training at Stage 3
The key question: Does your movement quality hold up under fatigue and load? If yes, progress. If not, stay or regress.
“Can I do exercises from multiple stages in the same week?”
Absolutely! And you probably should.
You might use:
- Stage 1 exercises as warm-ups or movement prep
- Stage 2 exercises as your primary higher volume hinge work
- Stage 3 exercises for testing or lower-volume strength work
The stages aren’t mutually exclusive. They’re tools in your toolbox.
“What if my form breaks down under fatigue but looks good when I’m fresh?”
This is a capacity issue, not a technique issue. Your options:
- Reduce volume — Fewer sets or reps per session
- Reduce load — Stay at a weight where form holds up even when tired
- Add more frequent, lower-volume sessions — Three sets of 5 twice a week might be better than six sets of 5 once a week
- Use regression variations at the end of sessions — If your barbell form breaks down, finish with trap bar or KB work that’s easier to maintain
Fatigue is normal. Technique breakdown under fatigue means you’ve exceeded your current capacity.
“Should I cycle back to Stage 1 periodically even if I’m deadlifting heavy?”
Yes, strategic regression is smart programming.
- Use Stage 1 and 2 variations as deload weeks or active recovery
- Use them as warm-up progressions before heavy work
- Return to them when coming back from injury or time off
- Program them as technique refinement days when you’re in a strength phase
Regression isn’t failure — it’s maintenance and refinement.
“I feel fine during the lift but sore in my lower back the next day. What’s wrong?”
This could be several things:
- Fatigue vs. Injury: Muscle soreness (DOMS) in the lower back is normal, especially if you’re new to hinging. Sharp pain or pain that worsens with movement is not.
- Form breakdown you didn’t notice: Film your sets. You might be losing neutral spine on later reps when fatigued.
- Volume too high too fast: Your lower back might not be conditioned for the workload yet. Reduce volume by 30-40% and build back up slowly.
- Poor hip extension at lockout: If you’re not finishing the lift with your glutes, your lower back is working overtime. Focus on standing tall at the top and flexing your glutes, abs, and quads to get a strong lockout. Think of it like a standing hip thrust.
What to do: Reduce load and volume, film your lifts, and consider adding targeted lower back and glute work (back extensions, glute bridges) to build capacity.
“What if I can’t feel my glutes or hamstrings working?”
This is common, especially for people who are quad-dominant or sit a lot.
Try these strategies:
- Pre-activation work: 2-3 sets of glute bridges or banded hip thrusts before hinging
- Pause at the bottom: Hold the bottom position of your hinge for 2-3 seconds to feel the stretch in your hamstrings
- Slow eccentrics: Take 3-4 seconds to lower into the hinge. This increases time under tension and builds awareness
- Use the right cues: “Push the floor away” and “squeeze your glutes to stand” rather than “pull with your back”
- Regress the variation: Sometimes trap bar or landmine variations make it easier to feel the right muscles working
Mind-muscle connection improves with practice. Be patient.
“Can I deadlift if I have a history of back pain?”
Maybe — but it depends on the specifics of your situation.
You should consult a healthcare provider if:
You have acute pain right now
You have a diagnosed condition (herniated disc, etc.) that hasn’t been cleared for training
Pain is sharp, radiating, or accompanied by numbness/tingling
If you’ve been cleared to train:
- Start at Stage 1 and build slowly
- Use pain as a guide (not all discomfort is bad, but sharp pain is a red flag)
- Choose variations that feel good (trap bar, landmine, or elevated pulls might be better than conventional)
- Consider working with a coach or physical therapist who understands strength training
- Many people with back pain history can deadlift successfully — it just requires thoughtful progression and variation selection.
When to Seek Professional Guidance
While this guide provides a comprehensive framework, some situations call for personalized coaching:
- You’ve tried these progressions but still experience pain during or after lifting
- Your form consistently breaks down despite following the cues
- You have a diagnosed injury or condition affecting your training
- You want real-time feedback on your technique
- You’re preparing for competition and need individualized programming
Our 1-on-1 coaching provides personalized form checks, troubleshooting, and programming tailored to your body and goals.
Our Ideal Strength app gives you structured programming with video demonstrations and progress tracking.
“My grip gives out before my legs and back. What should I do?”
Grip is often the limiting factor, especially for higher-rep work. Options:
- Use straps (occasionally) — Grip strength is important and should be built alongside your hinge strength. Use straps on higher rep work or on occasion with heavier pulls as needed. Straps are a tool, not a crutch.
- Train grip separately — Farmer’s carries, dead hangs, and plate pinches build grip strength without interfering with your hinge work
- Use mixed grip or hook grip — These increase grip capacity for heavy pulls or high-rep sets (but are not necessary for learning/technique work)
- Reduce rep ranges — Sets of 3-5 are easier on grip than sets of 8-12
Your hinge training shouldn’t be limited by your grip, but your grip shouldn’t also be weak. Use tools to train the pattern, while building up your grip capacity on the side.
“What’s the difference between an RDL and a deadlift?”
Romanian Deadlift (RDL):
- Starts from the top (standing)
- Eccentric-focused (lowering phase is the emphasis)
- Bar typically stops at mid-shin (wherever hamstring tension limits range)
- Less knee bend, more hip-dominant
- Great for building hamstring strength and eccentric control
Deadlift (conventional, sumo, trap bar):
- Starts from the floor
- Concentric-focused (pulling from the floor is the emphasis)
- Full range of motion from floor to lockout
- More total-body, involves more leg drive
- Great for building maximal strength and power
Both are hip hinges. Both are valuable. RDLs are often easier to learn and teach the pattern well. Deadlifts are the full expression of that pattern under maximal load.
“When should I test my 1-rep max?”
Testing your 1RM has its place, but it shouldn’t be frequent:
- Beginners (first 6-12 months of training): Don’t test. Build capacity with sets of 5-8. Your strength will go up without the risk of maxing out.
- Intermediate lifters: Test 2-4 times per year, typically at the end of a strength block and when form is proficient.
- Advanced lifters: Test when it serves your goals (competition prep, program design, etc.)
Most of your training should be in the 3-8 rep range with the barbell variations. Heavy singles are useful occasionally, but they’re not where strength is built — they’re where it’s expressed.
“How do I know if I’m progressing too fast?”
This is one of the most important questions beginners should ask. Here are the warning signs:
Red flags you’re moving too quickly:
- Form deteriorates significantly from week to week
- You experience pain during or after sessions
- You feel anxious or uncertain about your setup
- You can’t maintain the movement pattern when fatigued
- You’re adding weight but losing reps (strength isn’t actually improving)
- Recovery between sessions is poor (excessive soreness, fatigue)
Signs you’re progressing appropriately:
- Form stays consistent even as load increases
- You feel confident and controlled throughout each rep
- You can explain what you’re doing and why
- Fatigue is in the right places (glutes, hamstrings, not lower back)
- You’re sleeping well and recovering between sessions
- The movement feels more natural over time, not more difficult
What to do if you’re moving too fast: Take a step back. Drop the load by 20-30% and focus on quality for 2-3 weeks. Your ego might not like it, but your body will thank you.
Your Path Forward: From Pattern to Power
The hip hinge isn’t just another exercise — it’s a fundamental human movement that, when mastered, unlocks strength, resilience, and confidence in your body.
Here’s what you now have:
- A clear assessment tool to determine your starting point
- A progressive system that meets you where you are
- The knowledge to troubleshoot common problems
- A framework for long-term development
Here’s what to do next:
This Week: Complete the lightly loaded RDL screen. Be honest about what you see. Film yourself if possible.
Next 2-4 Weeks: Commit to your appropriate starting stage. Resist the urge to skip ahead. Master the fundamentals.
Ongoing: Train the hinge 2-3 times per week with intelligent variation. Your body will thank you for the consistency.
Remember: Every expert was once a beginner who refused to stay a beginner. The difference between those who build lasting strength and those who chase quick fixes is simple — they master the basics first, then build systematically from there.
Your spine has to last you a lifetime. Invest in learning to move it well.
The hip hinge is your foundation. Everything else is just building on top.
Found This Guide Helpful?
Share it with someone who’s learning to deadlift
Bookmark this page – you’ll want to reference it as you progress through the stages.
Ready to Build Your Deadlift?
This guide gives you the roadmap, but implementation is where the magic happens.
Choose Your Next Step:
📱 Want structured programming you can follow on your own?
Our Ideal Strength Training App gives you customized workouts that adapt to your progress, with video demos and built-in tracking for every session.
💪 Want personalized coaching and real-time form feedback?
Our personalized coaching gives you direct access to our team for troubleshooting, form checks, and programming tailored specifically to your body and goals.
📧 Want weekly strength training education?
Join our newsletter for evidence-based training tips, coaching insights, and program design strategies delivered to your inbox.
We’re here to help you build strength that lasts — not just for this year, but for life.
Have questions about this guide? Email us or drop a comment below.